So, being a family that lives on the outskirts of Santa Rosa bordering Sonoma and the Napa Valley Wine Country, my Dad had decided that he wanted to build a wine barrel smoker. He contacted a local winery and procured himself a nice Cabernet Sauvignon wine barrel. If my memory serves, the very following weekend he got to work on the project, sanding, drilling and screwing in each of the staves to each of the steel bands and creating the access door on the bottom to tend the heating source during smoking. I was not involved in the project at that point so I don't have any pictures from that portion of the process. If you head over to
Christopher King's Blog you can follow his account of these steps, the results were similar so the process I am sure was the same. From this point, the barrel sat for some time in my Dad's garage and then the holiday's came around when, as a surprise, my Mom bought Dad a full-sized Traeger Smoker and the barrel project instantly became moot. Dad quickly fell in love with his Traeger and had decided to give me the barrel to have and to finish, this is my account of the project to completion.
First, since this project was not my idea I really knew nothing about wine barrel smokers and needed to school myself before moving forward. I spent a couple weeks here and there looking at different sources on the internet, learning about all kinds of different smokers, how they work, the processes and options available as well as accounts of others specific wine barrel smoker projects. As I mentioned above, I found
Christopher King's Blog to be the most helpful and, as you can see from the exchanges we shared on the bottom of his post, he is a nice guy that provided a lot of useful answers to my questions and direction for me to head off in... I strongly you suggest you do your own research on these topics and definitely check out Christopher's blog as well.
So my project begins...
My first order of business was to get the top off this thing to see what I was working with... I used a meter stick as a guide and rested it against the steel band just above my cut to mark a guide line all the way around. I used a small Dremel cutting bit to make a 1/4" slit just large enough to insert the blade from a jigsaw. Then I went nice and slow as the staves are under a bit of pressure and can "snap" a bit when cutting through and transitioning from one to the next. People cut their lids at different heights... I found this to be right for me as my lid is not too heavy and I still have some height available to smoke some larger items, turkey, etc if I decide to. The smell inside is amazing... I am not even a huge wine guy but I still love it.

After I got the lid off, it was time to stain and treat the wood. You can pretty much use whatever you want for the outside of the barrel. Found a site on the internet that sells wine barrel smokers that seems to be pretty well made and they use polyurethane to preserve the outside from the elements, so I thought that was a safe bet and decided to go that route. I personally used an all-in-one stain with polyurethane that is both in one application. I applied 2 coats, each needing to cure for 6 hours before I was able to proceed to the next step. For the inside (yes I decided to treat the inside as well) I used Seal-Once Waterproof Wood Protector. It is non-toxic, has no VOC’s, is safe for the environment, protects against mold & Mildew, is water-based, odorless, non-flammable, non-combustible and will help keep the wood from expanding and contracting as much over the years making my barrel last longer (in theory). For those of you who are curious, this product did not effect the great wine smell on the inside once it cured. This product I let cure for 24 hours until moving onto the next step.
The base...
While my base and lid were curing I built this base for my barrel to sit in. I didn't want to screw caster wheels directly into the bottom of my barrel for a few different reasons. First, you don't have as wide of a stance on the bottom of the barrel so if you have an aggregate patio as I do and hit a rock or something the barrel can easily tip. Second I don't like the look as much (but this is personal preference). Third, I prefer to screw as few things as possible to my barrel for structural and longevity purposes. Lastly, I wanted to get the barrel a little higher off the ground to make it easier to work with, especially with regard to the access door and gas control valve on the bottom.
I used metal caster wheels. These barrels are heavy and if you live in warm weather, like me, rubber or plastic wheels can deform and flatten when sitting for long periods of time.
Back together again...
Time to get the lid attached. I went with the largest hinge my local hardware store had. Since the contour of the barrel limits you to one hinge point, and because the lid is pretty heavy, I decided to reinforce the area beneath the hinge to make sure it was solid and would last the life of the barrel... otherwise I would be concerned about prolonged use with only 2 staves supporting that much weight.
I would suggest going this route as well if you are considering different options... some guys put a handle on the top of the lid and lift the lid off like a Weber charcoal grill. This is fine but not ideal as the lid will not seat right unless you set it back on exactly the way it was originally before you cut it from the base with the staves lined up exactly right.
I then added chains so that I can simply lift the lid and have it rest there without flipping all the way over. If it ever slipped you would put a nice little dent/knick in your beautiful work of art. This also makes it very easy when handling food and you are by yourself. You can simply lift the lid in one hand while having a platter of your 'to be smoked' items in the other.
No matter how perfectly you cut the barrel, line it up, reinforce and mount the hinge, there will be a little bit of play in your lid when lifting and lowering your lid. NOTE - You can skip this step if you think it is overkill and don't like the idea or the look of it as it is admittedly not necessary. However, I personally don't think it looks that bad and prefer the benefit of the function of ensuring my lid seats properly without effort. This step helps ensure I get the best seal possible for smoke quality purposes so I went ahead and installed this guide fashioned from steel bands.

Because of the curve of the barrel this guide forces the lid to seat properly every time I lower the lid... this was a very easy and very simple fix to an admittedly small problem, but it was worth it to me. If you don't use some sort of guide then when you lower your lid you will simply have to look down at where the staves are lining up and slide the lid to the left or right until they are straight so you know your seal is good. Take it or leave this solution to avoid that. :)
Last step to finish off the lid was installing the handle. I put the handle in the vice and bend it a bit so that it not only matched the contour of the barrel, but also made its screw points sit in between the stave screws that were already in place.
In hindsight... I should have backed out the two closest screws to where my handle was to be fastened and then simply bent the handle to match those holes and then reinserted them so it resulted in a slightly cleaner look.
Finally, let's start putting the soul into this thing...
I took Christopher's recommendation from his blog and decided to go with the Afterburner V-Burner from
www.gassmoker.com. Good company and they get your unit to you fast, I think mine arrived 5 days after I placed my order via their website. Their standard unit is for use with a propane tank. I already have a plumbed natural gas line on my patio for my Weber gas grill, so I ordered the natural gas version of the V-Burner.
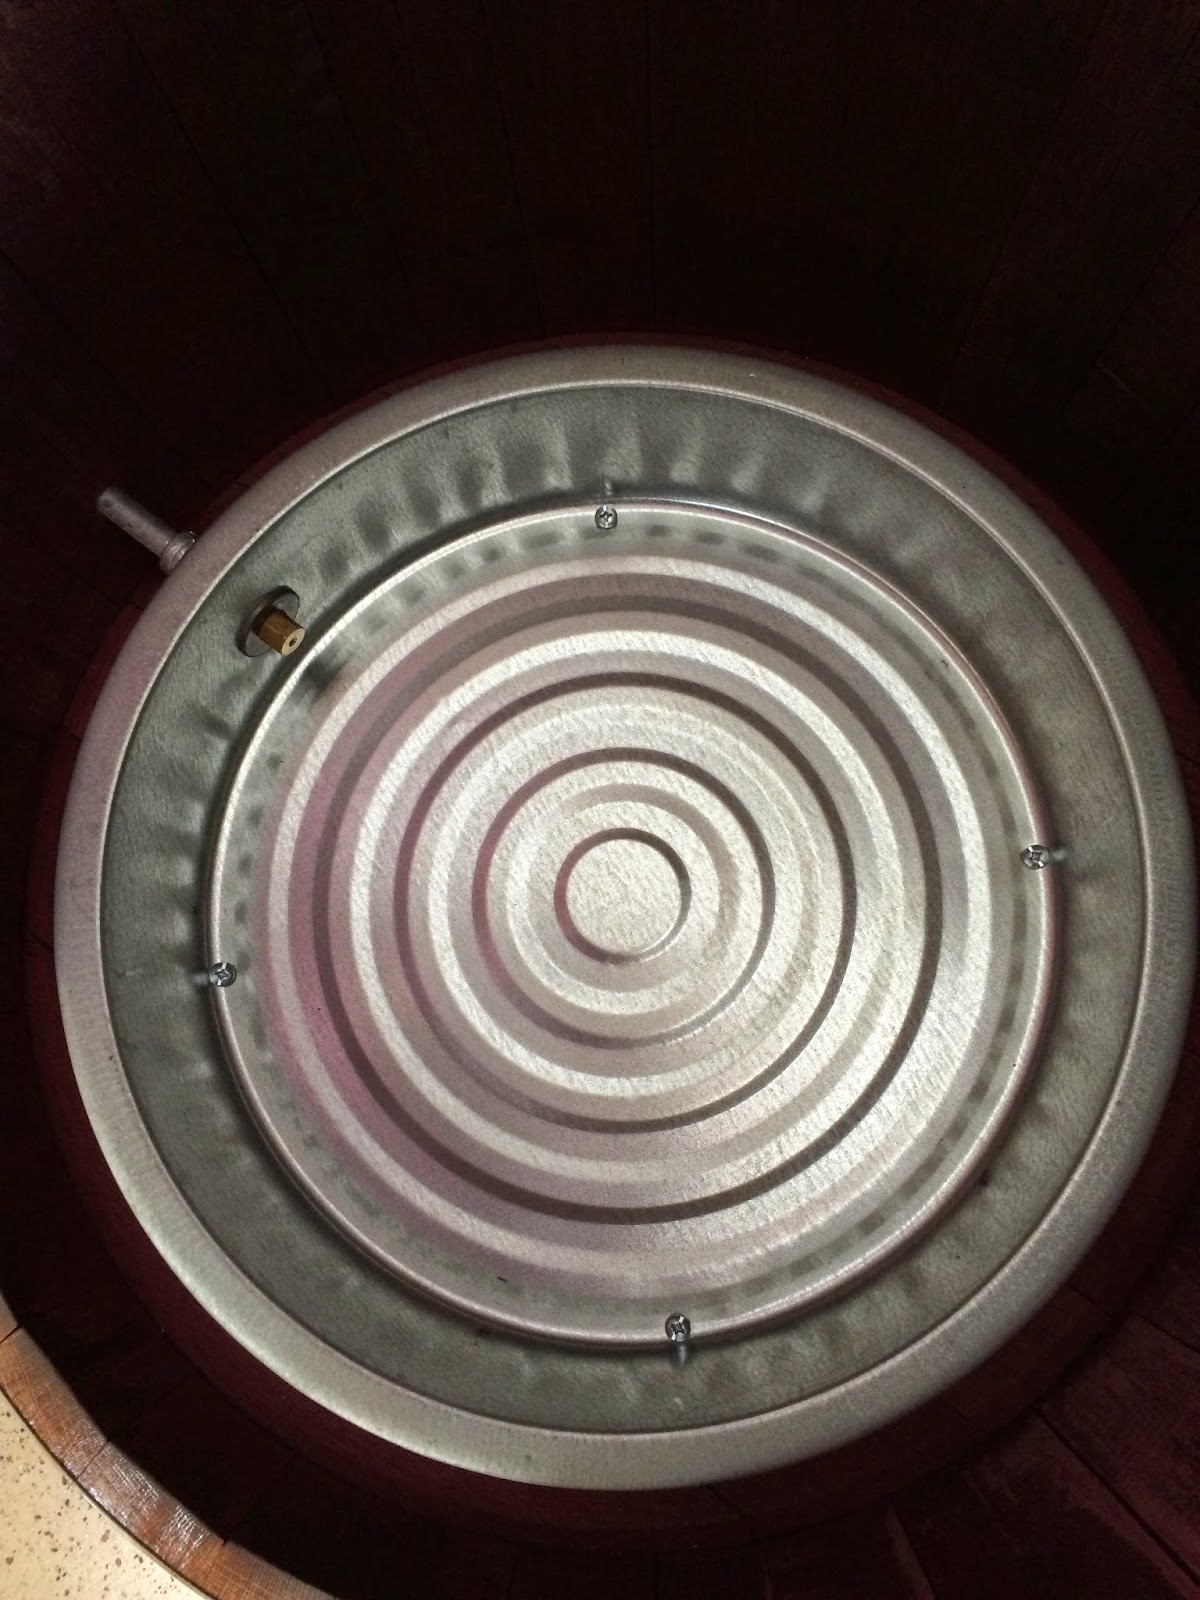
Even though I have no doubts that it would be perfectly safe at smoking temperatures, I did not want the V-Burner pan sitting directly on the bottom of the smoker so I placed a 10 1/2" Weber charcoal grate on the bottom of the barrel for the V-Burner pan to sit on to insulate the bottom of the barrel from the heat a bit.
The V-Burner pan went in next and I centered it in place and drilled four fastener screw holes.
Next I fastened the pan in place to secure everything. I did modify the V-Burner pan slightly to make it work for this barrel smoker application. The V-Burner arrived with a 1 inch 1/4" pipe coming out of the pan with a basic control valve screwed onto it. I removed this valve and added a 1/4" female to 1/4" female threaded connector and then a 4 inch 1/4" extender threaded at each end so that when I set the pan centered in the bottom of the barrel the end of the 4" pipe would protrude out a hole I drilled in the side of the barrel for this purpose.
I ditched the stock valve that came with the V-Burner and bought a higher quality valve that will give me a bit more control over the gas flow and added that to the protruding portion of pipe from the V-Burner inside the barrel.
Next I added standard quick connect fittings. As I mentioned before, I have a natural gas line plumbed into the back yard that my Weber gas grill is hooked to. I added the appropriate quick connect fittings to the line from my house and my Weber grill so that whenever I want to smoke something I can simply unplug my grill and plug in my smoker. At some point in the future, I will likely have a T-line installed so I can have both my smoker and Weber grill plugged in at the same time... if that happens then I will have dedicated lines for each and I will remove the quick connectors and screw the lines to each unit.
The V-Burner that sits inside the pan I installed above has an air intake which I will show below. It comes from the manufacturer set to 300ft altitude. Since the bunghole is something that needed to be addressed anyways, I decided to use it to feed the V-Burner intake with clean air from the outside of the barrel. I used 3/4" parts to make my air intake...
I used 2 identical floor flanges (one for the outside and one for the inside), high temperature caulking, and 4 sets of stainless steal hardware to seal the bunghole as shown in the picture to the left and the one below.
Here is what it looks like from the inside.
On the outside I built this intake mount so that I could easily control the amount of air coming in from the outside.
I found this air intake idea from a
YouTube Video a guy posted about his wine barrel smoker. All I did was put the cap on the pipe and drill a big hols all the way through out the opposite end.
Then, as you can see from this picture and the link I provided to the source YouTube video, simply by turning the cap from right to left you can limit or increase the size of the opening controlling the amount of air being pulled inside the barrel.
NOTE: I am going to purchase one more of the drawer handles from the dampers I used in the smoke stacks below and install in on the top of this cap. I might have another idea to improve this design as well but need to think it over a bit more. Whatever I end up doing I will update this blog with.
It kind of adds a bit of a visual flourish from the outside as well. :)
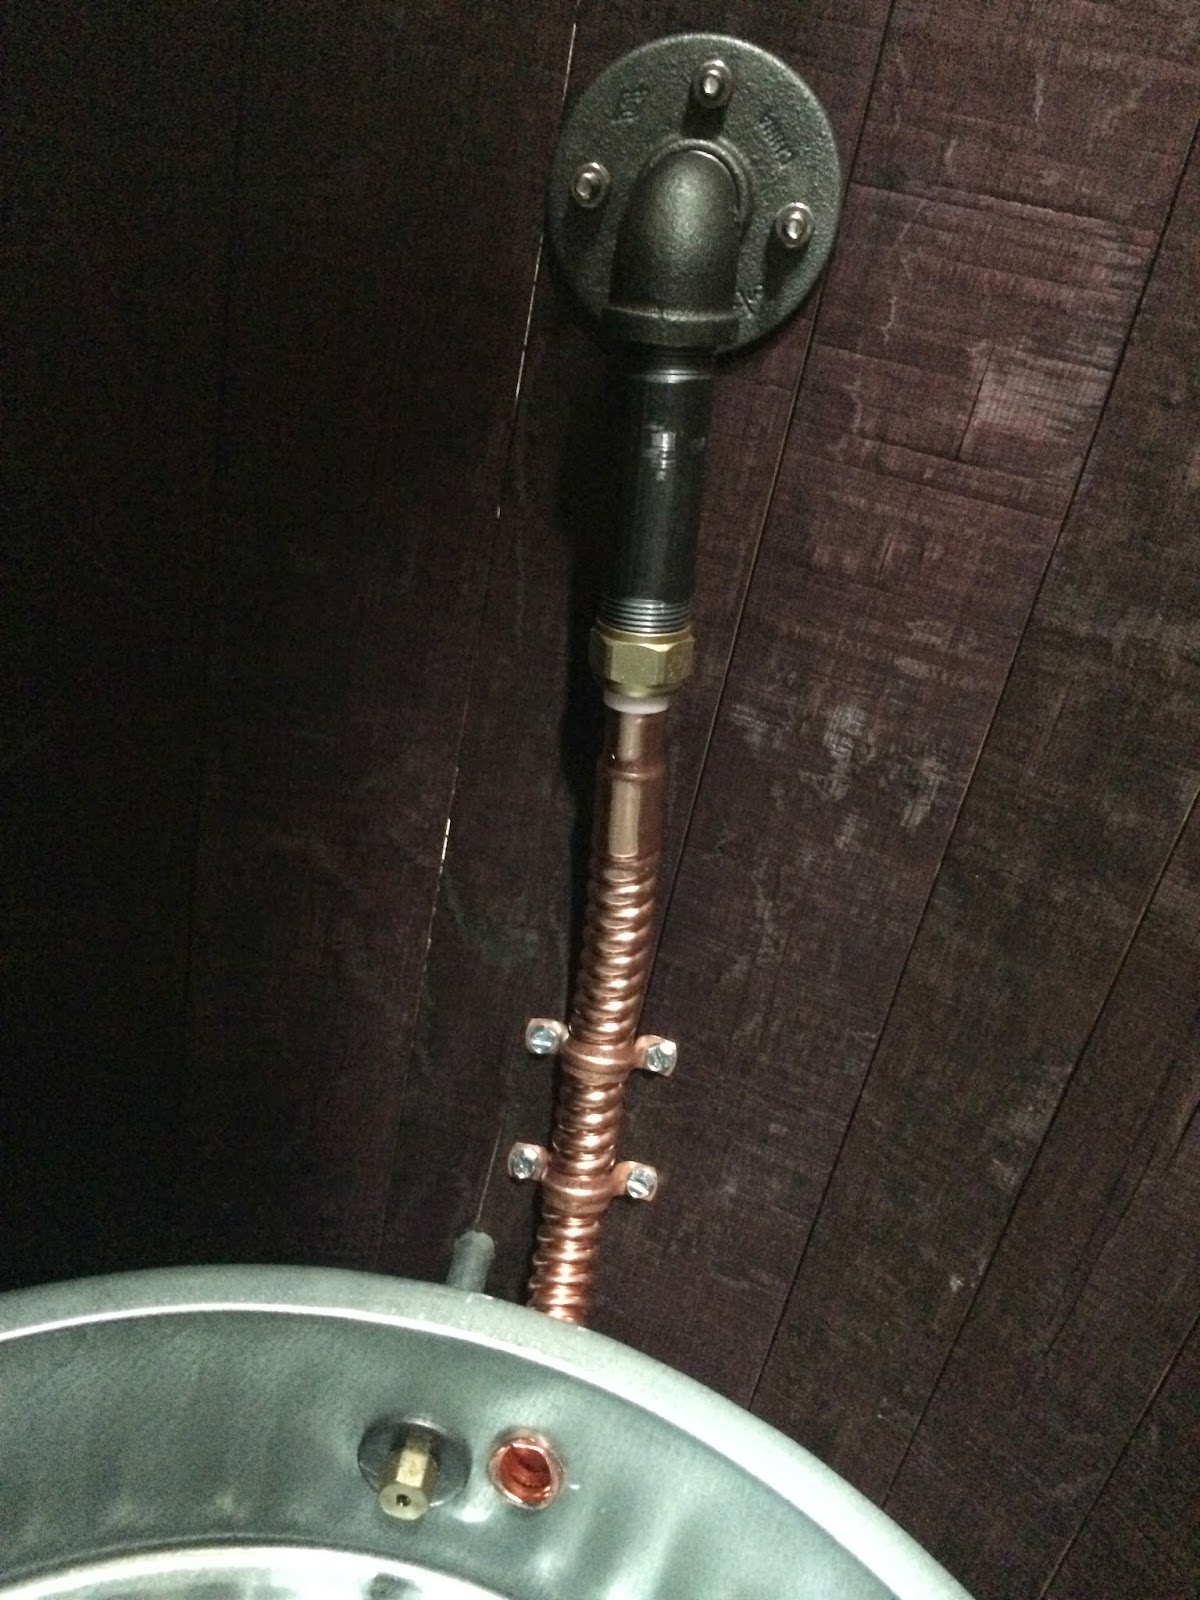
For the inside I used these parts to build a directed air intake. I did not know how smokey it would get at which levels of the smoker, so I wanted to make sure the air being pulled from outside the barrel was going right into the V-Burner intake and not filling the inside of the barrel which would affect the smoke/air ratio which, in turn, would impact my smoke flavor.
Here is another angle to see what I did... again, hindsight... going back to do it again I would have purchased a longer copper hose that would have reached all the way to the elbow joint to make it a bit cleaner. I know it doesn't matter at all as both will function the same... but I would do it that way if I was building another one.
Here is the V-Burner installed, it just slides and sets into place.
The two arrows by the intake is where a small metal slide is that can be
used to set elevation. As I said above, this is set from the manufacturer at 300ft, I chose not to mess with it at all. My intake from outside the barrel terminates right by the opening by design so there is no wasted air being pulled in.
Then I used a large Weber charcoal grate (19" I believe?) on the V-Burner to put my skillet on that will hold my smoke wood.
When the door is open, here is the view of the access to the V-Burner
and skillet. As you can see, there is plenty of room to light the
burner and manipulate the smoke materials.
Temperature gauge...

So, I went with this thermometer because I thought it looked the best
and it had really good ratings on the website I purchased it from. It
is called the BBQ/Smoker Thermometer from Tel-Tru.
NOTE: When you purchase most BBQ/Smoker thermometers, almost all of them
have threads on them. They will be sold with an upgrade option for an
additional hardware mounting kit that is usually $12 or so. You do not
need the extra mounting hardware if you buy a threaded thermometer.
When you install it you can simply drill a slightly smaller hole than
the threads and screw the thermometer directly into the side of your
barrel and get a perfect seal.
Get the largest length thermometer stem you can because you want the
thermometer pulling its temperature reading from as close to the center
of the barrel as possible.
I went with 6" because it gets me close enough and also does not stick out so far as to get in the way of me reaching down below it for cleaning and installation and removal of additional cooking surfaces or the water/drip pan.
Water pan/drip pan...

I have seen most guys using 2 separate pans/bowls here, one for drippingsand another for water to add moisture inside the barrel. Another idea I saw on Christopher's blog was to use one paela pan for both purposes, less stuff to deal with and less mess. I decided to go with a large wok for my water/drip pan. It is big enough to catch all the drippings from whatever I cook above and deep enough to have all the water I need to last a whole smoke.

These are the brackets I made for the wok, I went with 4 so it seats securely and I don't end up with any accidental messes.

And here it is in place...
Something to put the food on...
So I made these brackets to hold my cooking surface... there are a
million different kinds that you can make/buy that will work just fine.
I have seen guys just buy the 90 degree metal brackets or eyelet bolts
for this. I decided to go this route because it was easy, looked fine,
and made it so the cooking surface does not slide around once inserted.
I can clean the cooking grate with a BBQ scraper when done cooking if I
wanted to and it stays in place.

I went with 4 brackets for support here as well.
Time to add some personality...
I wanted some cool exhaust on this thing to really give it some character and personality. I wanted two (for no reason I can justify) and for them to be sizable. But they also go with the rest of the smoker and not stand out too much. I had originally wanted to go with motorcycle exhaust or a stack from a semi. But after considering those options I realized that having my whole smoker look as it does, having giant chrome pipes coming out the top wouldn't look right and the stack wouldn't look like they belonged on my smoker.
I finally found a local exhaust and muffler shop that I purchased a U shaped 3" pipe from. I had them cut that one pipe into the two sections you see here. I wanted the angle to keep any rainfall out while also not hindering any smoke flow.
Because I decided to go with such large stacks for the size of my unit I had to install baffles/dampeners to make sure, if needed, that I could control the outflow of smoke and heat from the barrel. I started by drilling a hole all the way through each pipe.
Then I put the pipes where I wanted them and scribed an outline.
I started with several holes using the biggest drill bit I had to remove the majority of the material.
Then I moved on to my Dremel with a sanding bit and just removed the remainder until I had smooth holes that the pipes fit very snugly into.
Then I sanded both the top, bottom and inside of the holes to make them nice and clean.
Then the pipes were put it place and turned to the right orientation I wanted them in.
Then the pipes were fastened into place with 3 screws each.
I went to the hardware store to the drawer and cabinet section and found knobs that I thought would go well with the barrel to use for outside control of the internal baffle/dampeners I made.
Here you can see my baffle/dampener design... relatively rudimentary but they do work. I orientated them with the handles on the outside so I can tell the internal orientation of the baffle/dampers just by looking at the knobs.
And here she is...
I put one more final coat of stain/polyurethane after all was said and done just to seal up everything real good which really darkened up the tone and made it a lot more rich and vibrant... I was surprised the final coat made such a difference.


 I have seen most guys using 2 separate pans/bowls here, one for drippingsand another for water to add moisture inside the barrel. Another idea I saw on Christopher's blog was to use one paela pan for both purposes, less stuff to deal with and less mess. I decided to go with a large wok for my water/drip pan. It is big enough to catch all the drippings from whatever I cook above and deep enough to have all the water I need to last a whole smoke.
  These are the brackets I made for the wok, I went with 4 so it seats securely and I don't end up with any accidental messes.
 And here it is in place...
 I went with 4 brackets for support here as well.


Very nice work Ryan! I like some of the strengthening that you did, especially around the lid hinge. You are preventing the exact problem I have sometimes with the two staves moving and creating hinging problems. I would be VERY interested in hearing from you after you have smoked a few times. I do plan on building another in the next couple of years. We are building our house now, so that is the focus, but then it will be the outdoor kitchen. I want to build a new smoker to place there. It will be a covered area with the gas grill, wine barrel smoker and a wood fired pizza oven. Specifically I would like to know how the air intake set up worked for you and if would change the design of it. Also I would like to know how the polyurethane holds up to the heat and use. I found over time that my staves shrank from drying out with the exposure to the heat. I could go on and on… As you know I dig this stuff. I am working on a new cut of pork to smoke. I had it at a restaurant last week… it was mouth watering! Dude, you did a superb job! Keep in touch!
ReplyDeleteHey there, I had family in town and was busy with work so sorry for the delay. Anyways, thank you very much for the kind words, I had an absolute blast building this thing. It is definitely something I want to last if at all possible so I did take extra precautions with treatment on both the inside and out to try and ensure its longevity, but needless to say, I am just as curious as you to see how it holds up over time. I will definitely keep you updated on my findings as far as the staves holding their shape based on the products I used to treat them, how the intake functions and my general overall thoughts the function of some of my other design decisions which may or may not turn out to be good ideas :). I have not had a chance to have the maiden smoke yet >:( as we have been having off and on rain lately and, since I have a flagstone and gravel path leading from the garage to the backyard I can't pull it around back without another person. So, I am waiting for the cover I ordered for this thing to arrive since once I bring it around back it is pretty much there permanently and I want it protected. I had read on another page that a guy had used cement filler to seal all the gaps between each of his staves... if the outside holds up on mine, I might do that in the future if I start to get the dry out and shrinking that you had experienced. Anyways, the cover should be here this week so this weekend should be my first smoke... any chance I can get your bacon explosion recipe? Sounds like a great first one to try, I almost tried to eat my computer monitor when I pulled up the picture of it! :)
DeleteHey mate, nice build! I'm just really curious as to how the staves are holding out with the sealer on the inside? I built a similar one a year or so ago, and as the dry heat in Western Australia can be brutal, im often filling the thing up with water to keep hydrated
ReplyDeleteHey there, thanks for taking the time to check out my build and comment! I can say that my staves are holding up very well and are virtually in just about the same condition as they were when I completed my build last year. However, I know I don't have the same dry heat that you guys experience down under and I also have to admit that I don't have another barrel which is untreated to compare mine to. So, I can't say for certain how much of a contributing factor the sealant I used on the inside has had. Not sure if that helps you or not, but feel free to ask me any other questions you might have an I will answer the best I can :)
DeleteHey Ryan,
ReplyDeleteThanks for posting the build pictures and your comments. I have a practical question. I'm going to use gas like you and I have two burners available locally. One is 2.5kWh and the second 6kWh. The V-burner you use equals 4kWh. Do you use that burner on full speed to maintain smoking range temperatures in the barrel or not?
I would definitely go with the lesser of the two... I would estimate that, on average, I never use more that 20-25% of the V-Burner's capability... and that is probably being generous. 6kWh I think would be very difficult to control temp wise to get that nice smoking temp. Hope that helps :)
DeleteRyan, thanks, took your advice and went with the 2.5kWh burner. Even on that one I don't use it on full capacity. More likely 25-40% depending on the required temperature. To get to 225 Fahrenheit I need 40% for fish even less.
DeleteI had some issues with the airflow and the gas stove would go out after a minute or so when it used up the oxygen. I didn't make any fancy pipes like you did, but instead drilled 1/2 inch holes around the barrel beneath the level of the burner. I made six of them and use one for the gas hose exit. Three similar holes in the lid make for a nice rising smoke effect and provide enough circulation to keep the flame alive and the smoke fresh.
I did my first smoke today and did salmon. It turned out great for a first time and I'm well happy with that. The fish was cooked just right and had that very lovely light golden crust. I smoked on a mix of beech and oak and first half of the smoke kept the temperature very low, say 100 Fahrenheit or so and once the salmon started to pearl I upped it to 150 Fahrenheit to finish her off.
When i was halfway through the smoke time of an hour I noticed that the smoke stopped. When I opened it to add more I noticed it all turned into charcoal. I don't know if that is what's supposed to happen or if it should burn to ashes instead? Obviously it didn't have enough oxygen inside the smoke box, but still it smoked like hell. What happens with your set-up?
I added some more wood and finished the smoke. I use a 2 inch deep 1/4 size stainless steel catering tray with a lid. You can usually see them on buffets when they serve hot food. They are cheap and any catering store sell them in all kinds of sizes and I figured 1/4 would be fine for on top of the burner. I had the lid on top, slightly diagonal so as to create two openings on either side for the smoke to go out. I could drill holes on top, but this way you don't ruin your lid.
For the next smoke I will try bigger pieces of wood to extend the smoking process. Next up beer-can chicken.
Marius, that is great that it is working so well for you! I am glad the burner you selected ended up working out... and I need to go ahead and also work on some sort of additional ventilation for mine... I might take a look at your route and go that direction if I can find a good place for the holes... because of my stand on the bottom, I don't like to gave any drainage, so I might need to get creative about how I go about doing that so as to still have a water tight bottom to my barrel... lots of easy options... just something I need to consider beforehand.
DeleteYeah as far as my smoke box I use a cast iron skillet with a cast iron flat fire griddle as my lid... even the small amount of air that gets in there can cause it to ignite sometimes and my wood often ends up as charcoal as well. I can minimize this by not letting me temp creep up... keeping the oxygen inside the barrel as low as possible, and by soaking my wood the day before a smoke. However, almost always I need to add more wood for the last hour or two to keep the smoke going... especially when I get a 6 hour rib smoke going with 6 full racks.
I have been meaning to get a larger smoke box or try taking the v-burners recommendation and taking a 3" round and putting it inside a soup can... but I haven't gotten around to it yet... I mean to though and will post my results when I do. Keep me updated if you find a good solution. I would love to give it a try!
Hi Ryan,
ReplyDeleteI'm getting ready to start my build, using lump charcoal, and was wondering how your rig is holding up. Have you had much stave movement? How well is the lid and body lining up? Any changes you would do if you were to build another one? How about some pics of your rig after a year of use?
It looks great. I dig the colors.
Thanks for your help.
Hey Keith! Glad to hear your getting started... lots of fun and great meals ahead! My barrel is holding up very well... although, I do have a small amount of stave movement since day 1, my barrel mostly looks identical from the day I built it... my cooking racks, firebox and water/drip wok are completely trashed, lol, but the barrel itself still looks like new. There are a few contributing factors to this though in my opinion... first, my barrel was in excellent shape when I got it... I sealed virtually perfect wood both inside and out. There was no rotting or anything that had started. Second, my climate is pretty moderate here in northern California... no real extreme heat or cold with relatively mild humidity. And lastly I had a custom waterproof outdoor marine grade cover made for my barrel so it has never been exposed to the elements.
DeleteAs far as things I would do differently... I would have had 2 cooking racks from day 1. I had to add a second rack because if you have a lot of people over 1 cooking surface just doesn't cut it. Additionally, I would do the firebox differently... read the comment thread above between me and Marius to find out more on that one. And I might have also reconsidered the placement of the thermometer... as it stands... the bar that extends into the barrel sticks in about 1/4 of the way into the center, so it makes it a little tricky sometimes to get my water/drip pan out. Other than that though I am very happy with the decisions I made and it is still holding up great!
Ryan, how's it going? I've made a couple of photos. Hope they are useful for others. https://www.facebook.com/media/set/?set=a.10152868145097443.1073741829.709057442&type=1&l=8e44c049ce
ReplyDeleteIt's going great Marius, thanks for asking! You are looking like you are doing well yourself from the photos :) Are you going to be running 2 smokers this summer? Anyways, I have a couple improvements I want to make regarding airflow to the burner as well as adding an additional rack for larger gatherings and need to smoke more than 3 racks of ribs... I will try and remember to post those after I make the changes.
DeleteI had a friend who asked me to make one for him as I had 3 barrels laying around. I agree with the double rack idea, although the mechanics of getting the dripping pan and lower rack in and out without interfering with the supports for both racks will need to be thought through. Another consideration is temperature control. Both racks should be as close as possible to each other to keep equal heat on both racks.
ReplyDeleteOne possible solution I can think of would be to hang the second rack form the steel rods that the top rack lays on. If you make four short pieces of chain with a hook you first place the drip pan, next hang the second rack load it with ribs and then place the top rack as usual.
This gives you the possibility to remove the top rack without interfering with the lower rack. Any other suggestions welcome.
Smoke on!
PS, have you ever smoked on Carob wood? I've got some here and it gives a very nice sweet smoke on Salmon.
I built a smoker from a red wine barrel and ended up using the smaller V-Burner Mini. I put a 20 inch pizza pan in the bottom and actually cut a 12 inch hole in the barrel so the burner sits flush to the bottom on the lip of the burner pan. This was suggested by the guy who builds the burner. I was very reluctant to cut a hole in my barrel but I did and it works great. Plenty of oxygen. I use an old aluminum rice cooker pot with the tempered glass lid (there is a "steam hole" in it) for a smoker pan. Thanks for all the tips guys. My barrel is beautiful and cooks like a champ. Smoke on!
ReplyDeleteThat is a GREAT idea! I never thought about altering the barrel prior to this build for fear that it would not give me as good of smoke penetration. I would love to implement this my next time around. For my current smoker I ended up taking a 1 inch drill bit and simply putting 4 holes all the way through the barrel so you can see all the way through to the ground... not optimal but it works fine, seems to have no effect on internal temp or smoke penetration AND I got some unintentional drain holes out of it :P
DeleteThis comment has been removed by the author.
ReplyDeleteQuick question: why did you stain the barrel after cutting the top off--does it make a difference? Just curious as I'm thinking of making a wine barrel charcoal smoker (right here in Santa Rosa).
ReplyDeleteHey there, thanks for the question! So for me it was two fold... first, I didn't want to have to do more than one phase of staining during the project and so since I stained both the inside and outside I needed the top off so I could do all the staining at once. Second, I wanted NO untreated wood for rot to begin from (I know this is not 100% possible but I wanted to do the best I could) and so I needed to wait until after cut the barrel so I could treat both sides of he cut on the lid and the bottom portion of the barrel. Honestly though you could do it in any order you wanted though as long as you get it all protected it shouldn't make a different on what order you do it.
DeleteGuys, in my opinion, after using the barrel for a year on a regular basis the inside is covered in some form of black film from the smoke. This acts as a coating if you like. I also don't think its a good idea to stain the inside of the barrel where food is prepared. Just in case.
ReplyDeleteI made a small design improvement I can share with you. As the lid is hinged only in one place it is prone to shifting when the lid is closed. This is not practical as it can snap the hinge or bend it if you're not careful when moving or during transport.
The solution is very simple. From a piece of leftover 6mm stainless steel threaded rod i cut a piece of around 5cm and drilled a hole half as deep into the top of the stave opposite of the hinge. Just to make sure this is drilling into the cut you made when you cut of the top of the barrel. (In the photo above the words "Time to add some personality..." you would drill down more or less right above the thermometer probe)
Next, insert the rod and tap it into position to fix it. Now close the lid aligning the staves and give it a good push or tap so as to mark where you need to drill the second hole in the lid.
If done right, when closed, the lid will be fixed in position and will not allow any movement whatsoever. I can now even push the barrel around holding it from the lid. Besides that, it looks very clean since no additional outside metalwork is needed.
Did you come up with any further improvements?
Ok, that is a fantastic idea, I wish I would have thought of that a year ago... I am totally doing that this weekend to secure the lid. Every time I have smoked anything while closing the lid I always look down to make sure it is lined up perfectly... no more! :)
DeleteThe only improvements I needed to address over the last year and a half was drainage and additional oxygen. When I have the smoker a little higher, around 215-220 the burner required the fire door open just a crack to ensure it had enough oxygen to not snuff out... open it a little too much and my wood pieces could sometimes ignite, the two combined required more attention given to a full day smoke then I would have wanted. The drainage issue I noticed when going to clean the smoker and dropping the drain pan... lol... not fun. I fixed both by drilling 4 equidistant holes through the bottom of the barrel through the burner pan and all so you can see the ground inside the barrel. This works like a charm for both respects... although I have not yet had to test the drain capabilities :)
Really awesome build! I work at a winery and my winemaker and I are going to build using yours and Christopher's as a blueprint.
ReplyDeletewhere are the extra pieces of metal from? We have extra wine barrel hoops but my question is how can we bend them perfectly to shape of the barrel without compromising the look of the pieces?
Glad I read the comments as they will completely help with my build. If interested come by our winery. Lancaster Estate in Healdsburg.
Once again, amazing looking smoker. Look forward to hearing from you.
Hey there, sorry for the delay in my response but it's awesome you are starting the project, glad to hear it! I hope your build goes well... please post pics when your done! As for the extra metal pieces you asked about, yes Marius is correct, when I picked up the barrel from a local winery they had some extra bands laying around from broken/extra barrels and allowed me to take two bands with me in addition to the barrel I bought from them. Whoever provides your winery with barrels may have some extras for you, or if you guys have ever broken a barrel you can salvage pieces off of it.
DeleteRegarding tips from using this smoker design for 2 years now... read through the comments... a lot of good tips and suggestions are in there which iterate on this design. Specifically, regarding Marius' findings on the inside of the barrel treatment, I haven't gotten the same buildup that he has, but it is worth noting that there is NO other treatment product I would recommend for the inside of the barrel than the specific product I mentioned. I did A LOT of research there to make sure there would be no adverse effects from using it... but like he said, you could skip step as after two years I am not sure if I realized any benefit from doing it. Also, his lid alignment idea is fantastic and better than the design I used initially. Also, Trey Hair mentioned another burner method which you should consider, I had some lack of oxygen issues every now and again which I ended up finally fixing by drilling 4 - 1" holes in the bottom of my barrel right through the burner pan, bottom of the barrel and all the way through the base to the ground to resolve. I will update the blog with useful modifications and improvements soon, I promise.
Thanks Michael and good luck, I will have to make it over to Lancaster Estate the next time I am in Healdsburg!
Michael, I would suggest that you use some extra rings from the same type of barrels. Surely you have plenty similar barrels laying around. If you select the ring from the same 'level' it should fit perfectly. Next you take your cutting tool and cut to the needed size.
ReplyDeleteHey Ryan Im trying to take a look at the flaps that you made inside of your smokestack. I cant really make out how you created such an awesome design? Any How To's? Anyone else have a different design to control the amount of smoke released?
ReplyDeleteHa, I JUST replied to your other post and when I updated this one appeared, LOL. Ok yes, I should have explained those a bit better as they were a pain in the ass to make. There is probably a better way to do it, but this is the way I did it. Probably want to read all the way through these steps before starting the first step... I will write this as a how to for a single smoke stack, simply repeat if you have more than one.
Delete1. Start with a thin piece of sheet metal and trace 2 circles using your smoke stack as a guide. (yes I realize these will be slightly bigger than the inside of the stack, trust me)
2. Use metal sheers to cut the circles out.
3. Then with your lid closed and your stacks fastened in place... find the lowest point down on your stacks that you can install and still manipulate whatever knob you will be using to turn the baffles without the top of the barrel hindering your use. At that location drill a hole directly through the middle of the stack out the back side just large enough for a bolt is the right size to screw into your knob.
4. Next, I put each of the circles into a vice with EXACTLY half of the circle sticking out of the top and lightly tapped on each just above the vice to cause a SLIGHT bend/crease along the diameter.
5. Place the circles together, bends facing so the middles don't want to touch but the edges do (middles should be maybe a 1/4" apart), pinched them in a vice to hold them in place and drill two small holes through them, across from each other on either side of the diameter fold, each about 1/2"-3/4" away from the center line.
6. Then, using 1 set of the following for each hole you just drilled (2 sets total)... 1 bolt, 2 washers, 1 nut... screw each pairs together to form a baffle, washers on the outside obviously held together with a nut and bolt.
7. Try to get these into your smoke stack and use a grinder, file or sander to bring them down so they fit nicely inside of your smoke stacks with as few gaps as possible. (if you would have traced the inside of your stack in the beginning, after making the folds your baffles would be too small)
8. Once the baffles are the right size, loosen the nuts and bolts just enough to allow the folds to separate just enough to fit the bolt that goes all the way through your smokestack and screws into your knob between them.
9. Holding the long bolt in one hand and a baffle you made in the other, hold the baffle up in the smokestack far enough to insert the bolt through one side of the smokestack, passing through the opening between the baffles and out the other side and then screw directly into your baffle handle/knob to hold in place.
10. Then, the annoying part :) Then alternating between each, tighten the nuts and bolts on the baffle 1 or two turns at a time, tightening them evenly until they are held snug on the bolt. Constantly rotate and slightly adjust during this process as you go to make sure the baffle stays centered until you are done tightening.
When you are done the baffle should turn by simply turning the knob from the outside. I really hope that helps Michael. Let me know if you have any other questions and good luck!
Hi Michael, Ryan's tubes look very nice indeed. I haven't got them, instead I just drilled 4 15-16mm holes in a cross pattern in the lid. There is about an inch of space between them and the holes are at the ends of the cross. It kinds of looks nice when it's smoking and vents the smoke well without releasing too much heat. You can always plug a hole with a cork or a piece of timber if you need to keep more heat in. If you need to vent more smoke, or heat, I use a very simple method, namely a piece of scrap timber to keep the lid open a bit. Works like a dream, not difficult. Happy smoking!
ReplyDeleteMuch easier indeed :) I have also seen people take the circular piece off of the top of a standard Weber charcoal BBQ and drill holes to use that as well... you can also make one of those from scratch pretty easily as well. Corks are a good idea and would fit the theme well :)
DeleteAlso where did you find that size of a wok?
ReplyDeleteI can't remember the exact website I used back then... but any commercial kitchen site should serve you well. You also don't have to use a wok... any pan should work fine if you can find a good deal on one... and based on the height you install it at, you might need a different diameter. Try here to get you started... http://www.webstaurantstore.com/2695/asian-woks-wok-covers-and-wok-rings.html
DeleteHey Ryan and Marius
ReplyDeleteSO I started my deconstruction phase today. I drilled in each stave and cut the top off. When it came off I noticed a a lot of mold growing on the surface of the interior. I was super bummed and felt all what I have done is ruined. But being at the winery I have my hands on some sulfur and a steam generator. So I did a light sulfur scrub on the entire inside and got rid of the mold. I then steam cleaned the entire inside. ahhhhhhhhh!!
So my question is in regards to the inside sealer that you used. Is it worth it? I do agree with Marius and feel it is a little hairy to put it on the inside where my food will be cooked... but I do not want to do that cleaning all over again, especially with all the hardware in place. Ryan are there any CONS for the inside sealer? Have you noticed any changes in flavor (or sickness haha). Even with the build up on the inside from smoking, I still feel there is a good chance for the barrel to grow something nasty on the wood. Ryan did you contact the manufacturing company and ask about using on wood that will be a cooking vessel?
Thank you for the responses.
Michael, sorry for the delay, out of town for work and just got back. I can't answer your question definitively because I do not believe there is a one way that is best for everyone. Was it worth it to me, I believe so yes, if just for the piece of mind. For me, I store my smoker outside in the backyard and during the winter we get a decent amount of rain here for a stretch and that causes moisture buildup for a prolonged period of time on the inside of the barrel do to the swing in temps etc. Some of my fittings rust each year which I have to clean up but no changes on the inside of the barrel at all, still like new. Was that due to my sealant or not, I honestly can't tell you because I don't have a control barrel to compare to. But I can tell you Christopher and others have stated they have some movement in their staves after prolonged use and I have had zero movement, expanding or contracting in mine and still have a great seal... but also Marius has not sealed his inside and has no issues. So you should consider where your barrel is going to be, how often you are going to use it, etc and decide which is right for you. As for the sealant itself, I did a lot of research and that is the ONLY sealer I found which is safe for this application... if you can't source any then skip the step. Hope that was at least helpful if not definitive. Let me know if you have any other questions. GL :)
DeleteMichael, all I can say is that after a few long cooks all the moisture will evaporate from the wood. Combined with the smoke residue that should prevent mould from reappearing. Remember, mould needs 80% humidity to grow. In a used smoker barrel that will not work. Bummer for mould, less work for you.
ReplyDeleteHello Ryan, that is an awesome WBS! Congrats! My friend and I are planing to build one in the next time. And I just spoke to the wine barrel builder. He said that we need to glue every wooden plank of the barrel because of the drying effect of the smoke?! Otherwise the Barrel would collapse. What are your experiences? I can not imagine that this could happen if we always use water inside the barrel for moisture.
ReplyDeleteI hope you can give us an advice for our WBS.
Best regards Ramona
Ramona, thank you fort he compliments and taking the time to check out my wine barrel smoker. Yes, your barrel maker is correct, the staves need to be secured in some way or else it is very likely your barrel will collapse over time. However, depending on the glue he is recommending I can't imagine that would be a long term solution. Over time the wood will expand and contract will moisture levels due to the weather as well as cooking. The chemical bonding of glue I believe would break down over time. Me and most other wine barrel smoker builders have instead used screws and secured each stave where they contact the bands. I would recommend you do this as well in your build. I hope that answers your question and don't hesitate to post again if you have any more questions. Thank you!
DeleteThank you for the answer!
DeleteUsing screws seems the better solution to me. It also adds a special look to the wine barrel smoker.
If any more questions arise I will definitely not hesitate to ask you again. 😉 Thank you !
Hello Ryan,
Deleteso the next question has occured.
We want to use a propan burner for our barrel. How much kW does your burner have? Has this one enough power for a 225l wine barrel? Which tempretaures do you achieve with it (highest and lowest)? We are not certain if a 2,5 kW burner is the right one or if we should buy a bigger one.
Best regards
Ramona
The burner I used in this build is rated at 4kW if my memory serves and it is really honestly too much for a standard sized barrel. Actually, if you look above in the comments, Marius and I discussed this issue and he ended up getting a 2.5kW burner and he stated he never uses it more that 40% or so of its full capability. You would be fine with going with going with that one... no need for anything bigger.
DeleteThank you very much!!
DeleteThank you very much!!
DeleteHi Ryan, do you have any photos of your system running? I would love to see a pic with smoke puffing out the double exhaust.
ReplyDelete